Raptor-Cal-FAQ: Difference between revisions
| (47 intermediate revisions by 2 users not shown) | |||
| Line 1: | Line 1: | ||
{{DISPLAYTITLE: Raptor-Cal FAQ}} | {{DISPLAYTITLE: Raptor-Cal FAQ}} | ||
{{Navigation}} [[Raptor-Platform | Raptor Platform]] > [[Raptor-Cal]] > '''Raptor-Cal FAQ''' | {{Navigation}} [[Raptor-Platform | Raptor Platform]] > [[Raptor-Cal]] > '''Raptor-Cal FAQ''' | ||
==What is Raptor-Cal?== | |||
Raptor-Cal tool is an intuitive, easy-to-use, yet powerful calibration tool. Raptor-Cal can be used to program and calibrate ECUs as well as create displays and | Raptor-Cal tool is an intuitive, easy-to-use, yet powerful calibration tool. Raptor-Cal can be used to program and calibrate ECUs as well as create displays and data log model signals. Check out our [https://wiki.neweagle.net/ProductDocumentation/Raptor/Raptor-Cal/Raptor-Cal_MarketingSheet.pdf Raptor-Cal one-page product summary]. | ||
==Does Raptor-Cal work with USB to CAN hardware?== | |||
Raptor-Cal works with any Kvaser or RP1210 USB to CAN hardware. | Raptor-Cal works with any Kvaser or RP1210 USB to CAN hardware. | ||
== | ==How do I create an RPG to use Raptor-Cal with MotoHawk?== | ||
We recommend using the 'New Eagle RPG Builder for MotoHawk' if you will be building the models directly. This tool is an installer option available while installing Raptor-Cal. | |||
If you are not building the models yourself, but have the SRZ and DLL, you can use this guide: [http://www.neweagle.net/support/wiki/ProductDocumentation/Raptor/Raptor-Cal/Raptor_RPG_File.pdf How to create a Raptor RPG File from SRZ]. | |||
==Where can I download Raptor-Cal?== | |||
If you have already purchased a software license, you can download the latest release of the Raptor-Cal software at [http://software.neweagle.net/issues/plugin.php?page=Artifacts/index software.neweagle.net]. | |||
==How do I use Raptor-Cal?== | |||
For instructions on getting started, please see our '''[http://www.neweagle.net/support/wiki/index.php?title=Raptor:Getting_Started#Programming_Setup_for_Raptor_Modules Getting Started]''' page. | |||
Please read the '''[http://www.neweagle.net/support/wiki/index.php?title=Raptor-Cal#Downloads Raptor-Cal User Guide]''' for detailed instructions on downloading, installing and using Raptor-Cal. | |||
==How do I recover a bricked module?== | |||
'''[[GCM-5634M-70-1459#Recovery_Procedure_.28Boot_Key.29|Raptor GCM Recovery]]''' | '''''Note''': Raptor GCM70 users should follow the steps on the '''[[GCM-5634M-70-1459#Recovery_Procedure_.28Boot_Key.29|Raptor GCM Recovery]]''' page if there are difficulties recovering the module.'' | ||
There are two slightly different procedures depending on the type of module you are trying to recover: | |||
===Raptor Module Recovery=== | |||
Connect and power on the Raptor module as normal. Open Raptor-Cal and follow the steps below: | |||
* Select the correct CAN channel; for recovery, this is typically 250kbps. Check the '''[[Raptor-Platform#Hardware|Raptor Hardware]]''' wiki page for more information. | |||
* Click the '''Flash''' button. The flash window will pop-up with 'No Modules'. | |||
* Select the '''Recover''' option in the bottom of the Flash window. | |||
* Select your module type--if it is not listed, press '''Other'''. '''''Note''': GCM70 users select MotoHawk.'' | |||
* Select your *.rpg file to flash onto the module. | |||
* Success! You have recovered the module. '''''Note''': If the module fails to recover, the software package may be to blame.'' | |||
===MotoHawk Module Recovery=== | |||
= | '''''Note''': MotoHawk modules require a boot harness or a boot key to recover. For more information, '''[http://mcs.woodward.com/support/wiki/index.php?title=Boot_key_recovery click here]'''.'' | ||
* Select the correct CAN channel. For recovery, this is typically 250kbps. | |||
* Navigate to the settings menu in File -> Settings -> MotoHawk. | |||
* Check that the ''Scan City ID'' field includes the default city ID of the module. | |||
* Plug in and connect the module but keep the '''key-switch power off'''. | |||
* Navigate the home page of Raptor-Cal and press '''Flash'''. | |||
* Select the '''Recover''' option in the bottom of the Flash window. | |||
* A menu will pop up with different module types; select '''MotoHawk'''. | |||
* Select your *.rpg file. | |||
* Raptor-Cal will perform a 30-second scan for the module. '''Turn key-switch power on now.''' | |||
* Success! Your module will now be flashed with the selected *.rpg file. '''''Note''': If the module fails to recover, the software package may be to blame.'' | |||
====S12 Module Recovery Procedure==== | |||
The S12 family of MotoHawk modules have a slightly different recovery process when using Raptor-Cal. Follow the steps below: | |||
* Navigate to the settings menu in File -> Settings -> MotoHawk. | |||
* Set the Raptor-Cal City ID to '''2'''. | |||
*Follow all the steps in the MotoHawk Module Recovery section above. | |||
==Windows Firewall Settings== | |||
In the event Raptor-Cal or the New Eagle License Viewer responds with an "HTTP Request Failure", Windows Firewall settings may need to be adjusted. | In the event Raptor-Cal or the New Eagle License Viewer responds with an "HTTP Request Failure", Windows Firewall settings may need to be adjusted. | ||
*Windows 7 / 10 | *Windows 7/10 | ||
** Two rules must be configured for Raptor-Cal | ** Two rules must be configured for Raptor-Cal | ||
*** Inbound | *** Inbound | ||
**** Raptor-Cal (In) | **** Raptor-Cal (In) | ||
*** Outbound | *** Outbound | ||
**** Raptor-Cal (Out) | **** Raptor-Cal (Out)<br><br> | ||
** Two rules must be configured for New Eagle License Viewer | ** Two rules must be configured for New Eagle License Viewer | ||
*** Inbound | *** Inbound | ||
| Line 71: | Line 72: | ||
**** New Eagle License Viewer (Out) | **** New Eagle License Viewer (Out) | ||
The setup is common for each rule, aside from the | The setup is common for each rule, aside from the program path and rule name: | ||
* Rule Type: Program | * Rule Type: Program | ||
* Program: | * Program: | ||
** Raptor-Cal: <i>%ProgramFiles% (x86)\NewEagle\Raptor-Cal\Raptor-Cal.exe</i> | ** Raptor-Cal: <i>%ProgramFiles% (x86)\NewEagle\Raptor-Cal\Raptor-Cal.exe</i> | ||
** New Eagle License Viewer: <i>%ProgramFiles% (x86)\NewEagle\Licensing\NewEagle.LicenseViewer.exe</i> | ** New Eagle License Viewer: <i>%ProgramFiles% (x86)\NewEagle\Licensing\NewEagle.LicenseViewer.exe</i> | ||
** Action: Allow the | ** Action: Allow the connection | ||
** Profile: Select Domain, Private and Public | ** Profile: Select Domain, Private and Public | ||
** Name: | ** Name: | ||
** Raptor-Cal: | *** Raptor-Cal: | ||
*** Inbound Rule: <i>Raptor-Cal (In)</i> | **** Inbound Rule: <i>Raptor-Cal (In)</i> | ||
*** Outbound Rule: <i>Raptor-Cal (Out)</i> | **** Outbound Rule: <i>Raptor-Cal (Out)</i> | ||
** New Eagle License Viewer: | *** New Eagle License Viewer: | ||
*** Inbound Rule: <i>New Eagle License Viewer (In)</i> | **** Inbound Rule: <i>New Eagle License Viewer (In)</i> | ||
*** Outbound Rule: <i>New Eagle License Viewer (Out)</i> | **** Outbound Rule: <i>New Eagle License Viewer (Out)</i> | ||
==How can I change my logging/capture rate in Raptor-Cal?== | |||
This is done in the Target Definition block in the Raptor-Dev model. | This is done in the '''[[Raptor:Target_Definition_Block|Target Definition]]''' block in the Raptor-Dev model. | ||
Check out the clip below to see how to change your DAQ speeds in Raptor-Cal/Service. | Check out the clip below to see how to change your DAQ speeds in Raptor-Cal/Service. | ||
| Line 94: | Line 95: | ||
[[File:DAQ_FAQ.gif]] | [[File:DAQ_FAQ.gif]] | ||
===Debugging and Troubleshooting | As of release 2018a, the Faster/Slower buttons have been replaced with a Right-Click Action. Right-clicking on a signal or selection of signals opens a context menu that allows one to move the selected signal(s) directly into an allowed DAQ List or Queue. | ||
[[File:Daq rt click menupng.png]] | |||
===Why are my chart scale values not displaying correctly?=== | |||
Margins around the vertical chart scale are fixed and fairly small to allow as much space for plots. To accommodate this, the scale values are factored down to fix correctly. This happens on values greater than 10000, where 10000 would show as 1000.0. Larger values will be scaled even more; 100000 would be scaled to 100.0. | |||
==Debugging and Troubleshooting== | |||
When debugging using the Raptor | When debugging using the Raptor suite, having a CAN trace is often extremely useful for our support team. | ||
A CAN | A CAN trace is simply a log file of CAN data. Below is a list of instructions to get a complete CAN trace to send to us. | ||
'''CAN Trace Instructions:''' | '''CAN Trace Instructions:''' | ||
* Download Kvaser | * Download Kvaser CANKing, a free CAN monitoring software | ||
* Open | * Open CANKing and navigate to the logging feature | ||
** | ** Locate: '''View''' (1) -> '''Log to File''' (2) | ||
[[File:cantrace1.png|400px]] | [[File:cantrace1.png|400px]] | ||
* Next, make sure | * Next, make sure CANKing is configured to read CAN data from your hardware configuration | ||
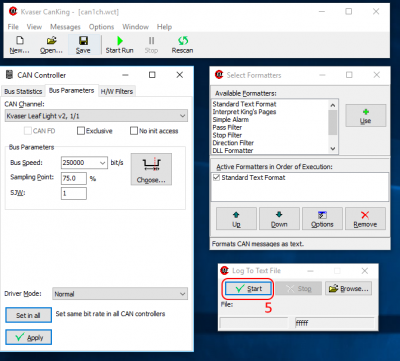
* Navigate to '''Bus Parameters''' (3) and select your '''CAN Channel''' and '''Bus Speed''' (4) | * Navigate to '''Bus Parameters''' (3) and select your '''CAN Channel''' and '''Bus Speed''' (4) | ||
[[File:cantrace2.png|400px]] | [[File:cantrace2.png|400px]] | ||
* Start a CAN log by pressing '''Start''' in the Log to File | * Start a CAN log by pressing '''Start''' in the '''Log to File''' window (5) | ||
* This will prompt you to choose and save a file location | * This will prompt you to choose and save a file location | ||
[[File:cantrace3.png|400px]] | [[File:cantrace3.png|400px]] | ||
* Simulate the issue you are having - typically connecting to or flashing an ECU | * Simulate the issue you are having--typically connecting to or flashing an ECU | ||
* Once you have | * Once you have run into your issue, stop the CAN log and locate the CAN log file | ||
* Send | * Send the CAN log file with a description of the issue you are having to [mailto:support@neweagle.net support@neweagle.net] | ||
==How to Use the Charting Surface== | |||
[[File:how_to_chart.gif]] | |||
==Why do I have a red exclamation point next to my DAQ rate?== | |||
[[File:RxFault.png]] | |||
This icon is displayed when Raptor-Cal detects that messages are not being received at the expected rate. A high CAN bus load could be the cause of this warning. | |||
Latest revision as of 21:41, 16 February 2023
New Eagle > Products Wiki > Raptor Platform > Raptor-Cal > Raptor-Cal FAQ
What is Raptor-Cal?
Raptor-Cal tool is an intuitive, easy-to-use, yet powerful calibration tool. Raptor-Cal can be used to program and calibrate ECUs as well as create displays and data log model signals. Check out our Raptor-Cal one-page product summary.
Does Raptor-Cal work with USB to CAN hardware?
Raptor-Cal works with any Kvaser or RP1210 USB to CAN hardware.
How do I create an RPG to use Raptor-Cal with MotoHawk?
We recommend using the 'New Eagle RPG Builder for MotoHawk' if you will be building the models directly. This tool is an installer option available while installing Raptor-Cal.
If you are not building the models yourself, but have the SRZ and DLL, you can use this guide: How to create a Raptor RPG File from SRZ.
Where can I download Raptor-Cal?
If you have already purchased a software license, you can download the latest release of the Raptor-Cal software at software.neweagle.net.
How do I use Raptor-Cal?
For instructions on getting started, please see our Getting Started page.
Please read the Raptor-Cal User Guide for detailed instructions on downloading, installing and using Raptor-Cal.
How do I recover a bricked module?
Note: Raptor GCM70 users should follow the steps on the Raptor GCM Recovery page if there are difficulties recovering the module.
There are two slightly different procedures depending on the type of module you are trying to recover:
Raptor Module Recovery
Connect and power on the Raptor module as normal. Open Raptor-Cal and follow the steps below:
- Select the correct CAN channel; for recovery, this is typically 250kbps. Check the Raptor Hardware wiki page for more information.
- Click the Flash button. The flash window will pop-up with 'No Modules'.
- Select the Recover option in the bottom of the Flash window.
- Select your module type--if it is not listed, press Other. Note: GCM70 users select MotoHawk.
- Select your *.rpg file to flash onto the module.
- Success! You have recovered the module. Note: If the module fails to recover, the software package may be to blame.
MotoHawk Module Recovery
Note: MotoHawk modules require a boot harness or a boot key to recover. For more information, click here.
- Select the correct CAN channel. For recovery, this is typically 250kbps.
- Navigate to the settings menu in File -> Settings -> MotoHawk.
- Check that the Scan City ID field includes the default city ID of the module.
- Plug in and connect the module but keep the key-switch power off.
- Navigate the home page of Raptor-Cal and press Flash.
- Select the Recover option in the bottom of the Flash window.
- A menu will pop up with different module types; select MotoHawk.
- Select your *.rpg file.
- Raptor-Cal will perform a 30-second scan for the module. Turn key-switch power on now.
- Success! Your module will now be flashed with the selected *.rpg file. Note: If the module fails to recover, the software package may be to blame.
S12 Module Recovery Procedure
The S12 family of MotoHawk modules have a slightly different recovery process when using Raptor-Cal. Follow the steps below:
- Navigate to the settings menu in File -> Settings -> MotoHawk.
- Set the Raptor-Cal City ID to 2.
- Follow all the steps in the MotoHawk Module Recovery section above.
Windows Firewall Settings
In the event Raptor-Cal or the New Eagle License Viewer responds with an "HTTP Request Failure", Windows Firewall settings may need to be adjusted.
- Windows 7/10
- Two rules must be configured for Raptor-Cal
- Inbound
- Raptor-Cal (In)
- Outbound
- Raptor-Cal (Out)
- Raptor-Cal (Out)
- Inbound
- Two rules must be configured for New Eagle License Viewer
- Inbound
- New Eagle License Viewer (In)
- Outbound
- New Eagle License Viewer (Out)
- Inbound
- Two rules must be configured for Raptor-Cal
The setup is common for each rule, aside from the program path and rule name:
- Rule Type: Program
- Program:
- Raptor-Cal: %ProgramFiles% (x86)\NewEagle\Raptor-Cal\Raptor-Cal.exe
- New Eagle License Viewer: %ProgramFiles% (x86)\NewEagle\Licensing\NewEagle.LicenseViewer.exe
- Action: Allow the connection
- Profile: Select Domain, Private and Public
- Name:
- Raptor-Cal:
- Inbound Rule: Raptor-Cal (In)
- Outbound Rule: Raptor-Cal (Out)
- New Eagle License Viewer:
- Inbound Rule: New Eagle License Viewer (In)
- Outbound Rule: New Eagle License Viewer (Out)
- Raptor-Cal:
How can I change my logging/capture rate in Raptor-Cal?
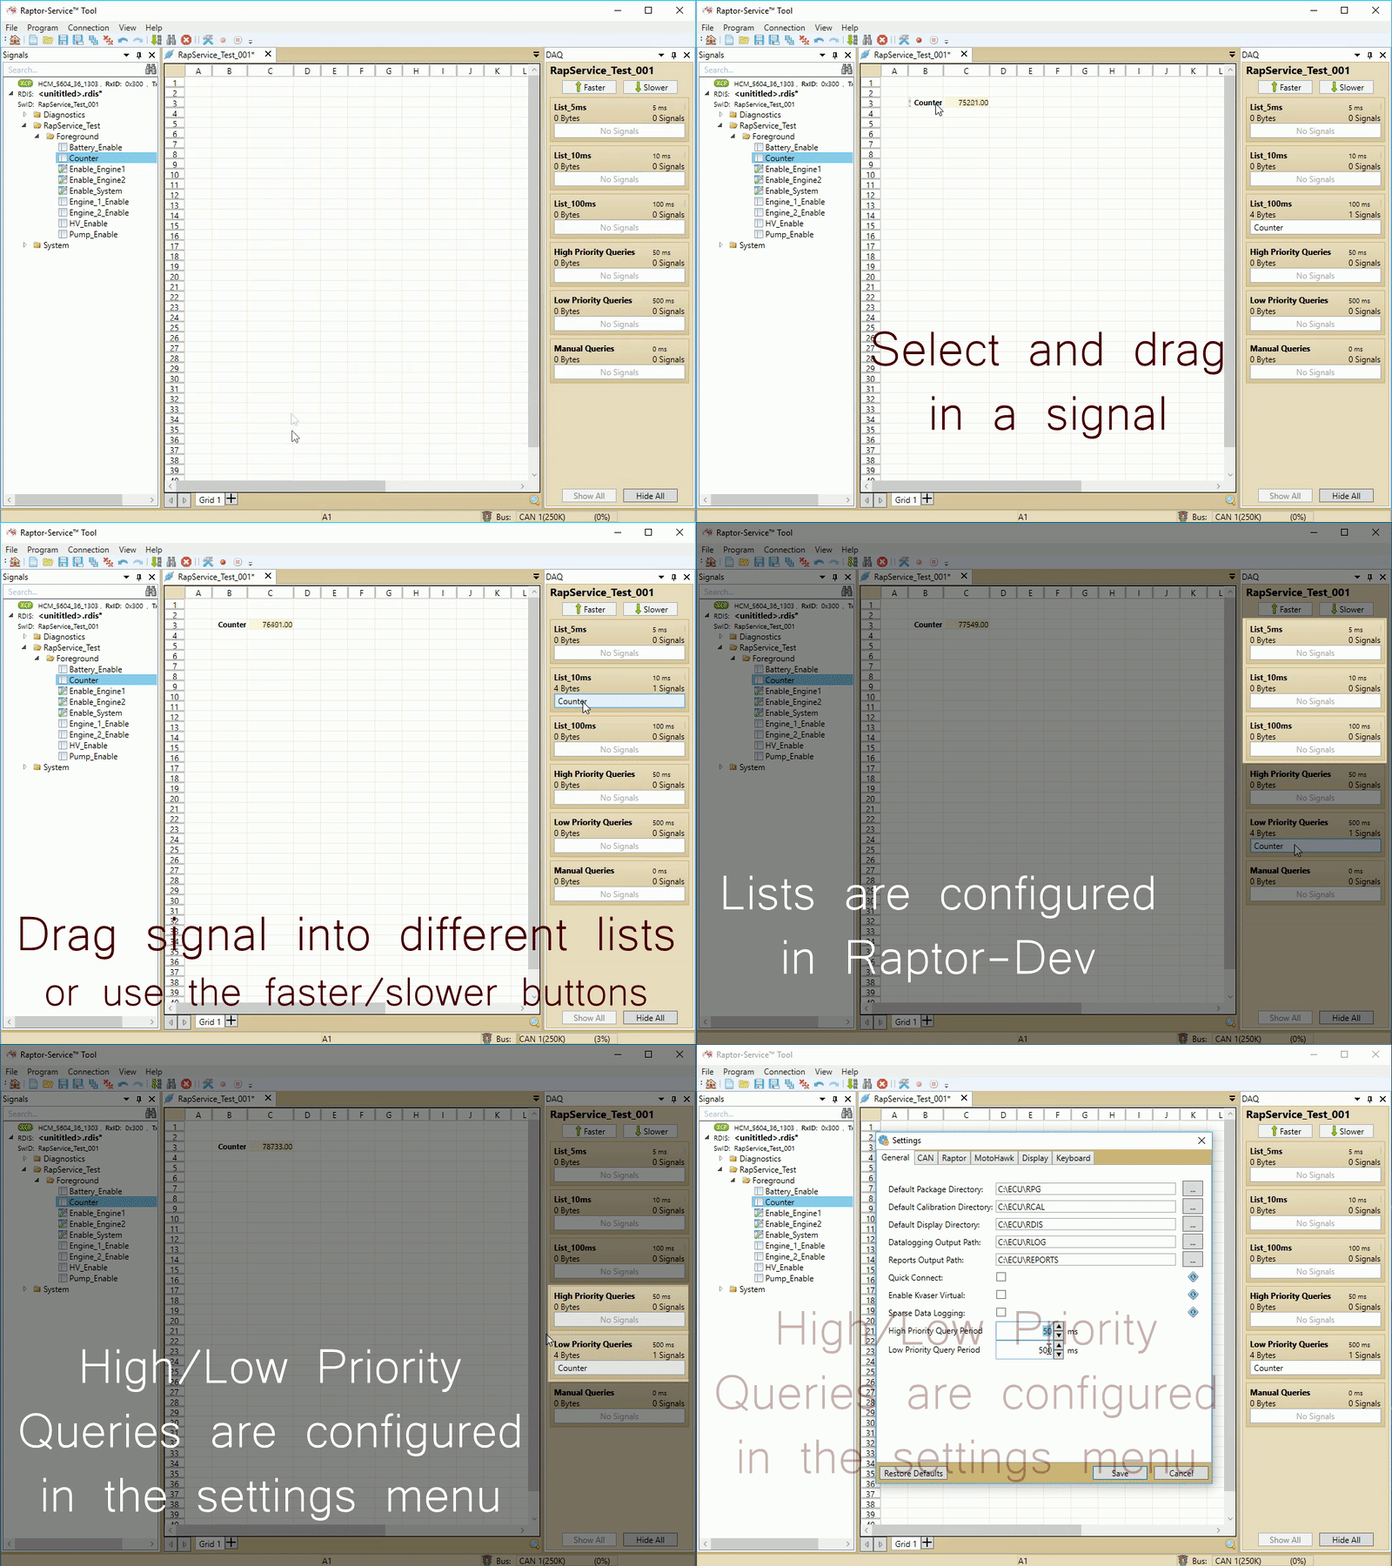
This is done in the Target Definition block in the Raptor-Dev model.
Check out the clip below to see how to change your DAQ speeds in Raptor-Cal/Service.
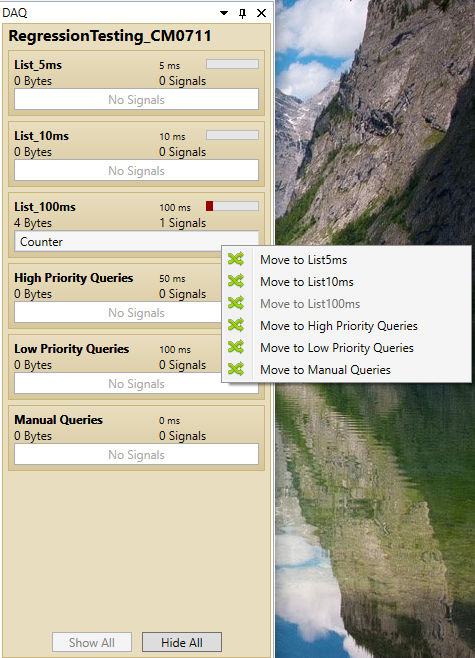
As of release 2018a, the Faster/Slower buttons have been replaced with a Right-Click Action. Right-clicking on a signal or selection of signals opens a context menu that allows one to move the selected signal(s) directly into an allowed DAQ List or Queue.
Why are my chart scale values not displaying correctly?
Margins around the vertical chart scale are fixed and fairly small to allow as much space for plots. To accommodate this, the scale values are factored down to fix correctly. This happens on values greater than 10000, where 10000 would show as 1000.0. Larger values will be scaled even more; 100000 would be scaled to 100.0.
Debugging and Troubleshooting
When debugging using the Raptor suite, having a CAN trace is often extremely useful for our support team.
A CAN trace is simply a log file of CAN data. Below is a list of instructions to get a complete CAN trace to send to us.
CAN Trace Instructions:
- Download Kvaser CANKing, a free CAN monitoring software
- Open CANKing and navigate to the logging feature
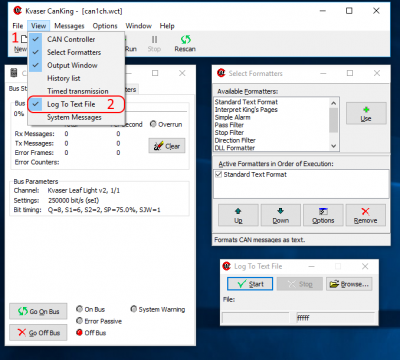
- Locate: View (1) -> Log to File (2)
- Next, make sure CANKing is configured to read CAN data from your hardware configuration
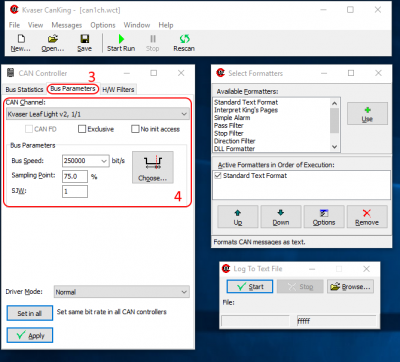
- Navigate to Bus Parameters (3) and select your CAN Channel and Bus Speed (4)
- Start a CAN log by pressing Start in the Log to File window (5)
- This will prompt you to choose and save a file location
- Simulate the issue you are having--typically connecting to or flashing an ECU
- Once you have run into your issue, stop the CAN log and locate the CAN log file
- Send the CAN log file with a description of the issue you are having to support@neweagle.net
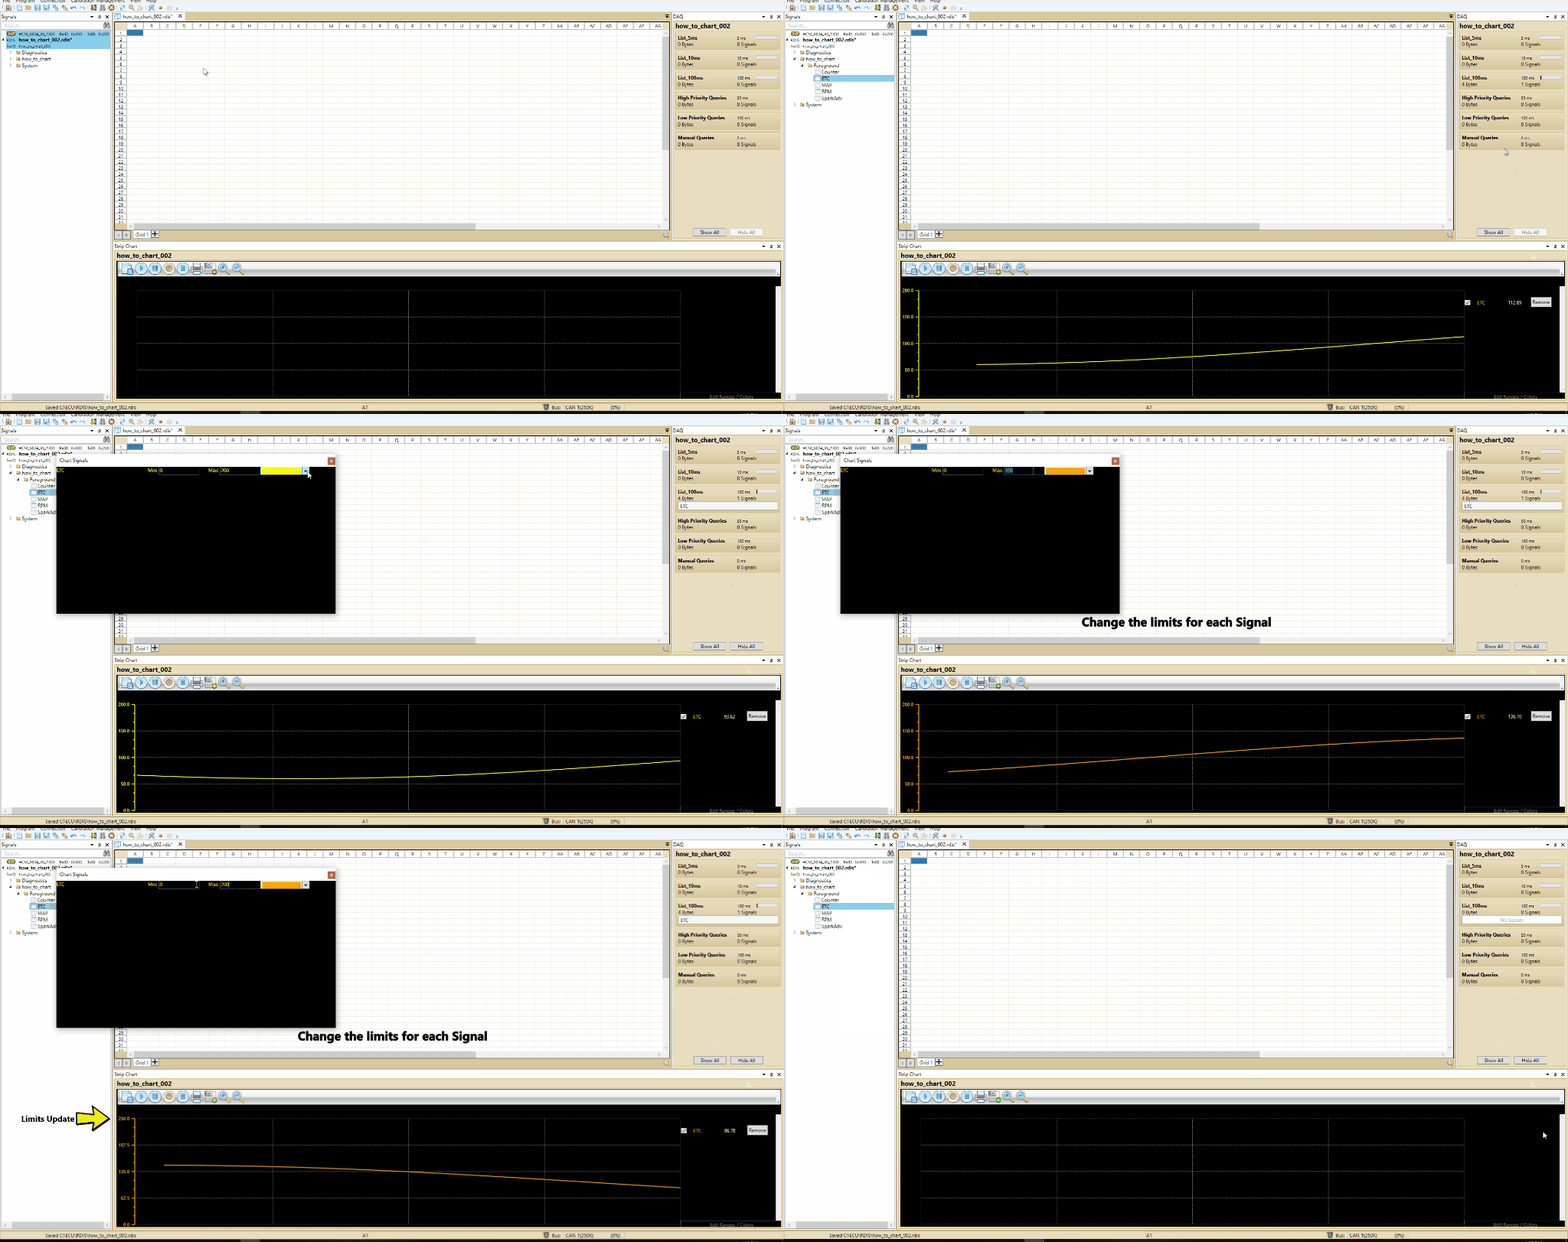
How to Use the Charting Surface
Why do I have a red exclamation point next to my DAQ rate?
This icon is displayed when Raptor-Cal detects that messages are not being received at the expected rate. A high CAN bus load could be the cause of this warning.
