Raptor-Cal-FAQ
New Eagle > Products Wiki > Raptor Platform > Raptor-Cal > Raptor-Cal FAQ
What is Raptor-Cal?
Raptor-Cal tool is an intuitive, easy-to-use, yet powerful calibration tool. Raptor-Cal can be used to program and calibrate ECUs as well as create displays and datalog model signals. Check out our Raptor-Cal one-page product summary.
Does Raptor-Cal work with any USB to CAN hardware?
Raptor-Cal works with any Kvaser or RP1210 USB to CAN hardware.
Where can I download Raptor-Cal?
If you have already purchased a software license, you can download the latest release or of the Raptor-Cal software at software.neweagle.net.
How do I use Raptor-Cal?
For instructions on getting started, please click here
Please read the Raptor-Cal User Guide for detailed instructions on download, installing, and using Raptor-Cal.
How to I recover a bricked module?
There are two slightly difference procedures depending on the type of module you are trying to recover:
Raptor Module Recovery
Connect and power on the Raptor Module as normal. Open Raptor-Cal and follow the steps below:
- Select the correct CAN channel, for recovery this is typically 250kbps. Check the Raptor Hardware Wiki page for more information
- Click the Flash button, the flash window will pop-up and say 'No Modules'
- Select the Recover option in the bottom of the Flash window
- Select your module type, if it is not listed press Other
- Select your .RPG to flash onto the module
- Success! You have recovered the module. Note: if the module fails to recover the software package may be to blame
MotoHawk Module Recovery
Note: MotoHawk Modules require a boot harness or a boot key to recover. For more information Click Here
- Select the correct CAN channel, for recovery this is typically 250kbps
- Navigate to the settings menu in File > Settings > MotoHawk
- Check that the Scan City ID field includes the default city ID of the module
- Plug in and connect the module but keep the keyswitch power off
- Navigate the home page of Raptor-Cal and press Flash
- Select the Recover option in the bottom of the Flash window
- A menu will pop up with different module types, select MotoHawk
- Select your .RPG file
- Now Raptor-Cal will perform a 30 second scan for the module, Turn keyswitch power on now
- Success! Your module will now be flashed with the selected .RPG file. Note: if the module fails to recover the software package may be to blame
S12 Module Recovery Procedure
The S12 family of MotoHawk modules have a slightly different recovery process when using Raptor-Cal. Follow the provided steps below:
- Navigate to the settings menu in File > Settings > MotoHawk
- Set the Raptor-Cal City ID to 2
Next, follow all the steps in the MotoHawk Recovery Section above
Windows Firewall Settings
In the event Raptor-Cal or the New Eagle License Viewer responds with an "HTTP Request Failure", Windows Firewall settings may need to be adjusted.
- Windows 7 / 10
- Two rules must be configured for Raptor-Cal
- Inbound
- Raptor-Cal (In)
- Outbound
- Raptor-Cal (Out)
- Inbound
- Two rules must be configured for Raptor-Cal
- Two rules must be configured for New Eagle License Viewer
- Inbound
- New Eagle License Viewer (In)
- Outbound
- New Eagle License Viewer (Out)
- Inbound
- Two rules must be configured for New Eagle License Viewer
The setup is common for each rule, aside from the Program Path and Rule name:
- Rule Type: Program
- Program:
- Raptor-Cal: %ProgramFiles% (x86)\NewEagle\Raptor-Cal\Raptor-Cal.exe
- New Eagle License Viewer: %ProgramFiles% (x86)\NewEagle\Licensing\NewEagle.LicenseViewer.exe
- Action: Allow the conenction
- Profile: Select Domain, Private and Public
- Name:
- Raptor-Cal:
- Inbound Rule: Raptor-Cal (In)
- Outbound Rule: Raptor-Cal (Out)
- New Eagle License Viewer:
- Inbound Rule: New Eagle License Viewer (In)
- Outbound Rule: New Eagle License Viewer (Out)
Debugging and Troubleshooting
When debugging using the Raptor Suite having a CAN trace is often extremely useful for our Support team.
A CAN Trace is simply a log file of CAN data. Below you can find a list of instructions to get a complete CAN trace to send to us.
CAN Trace Instructions:
- Download Kvaser CANking, a free CAN monitoring software
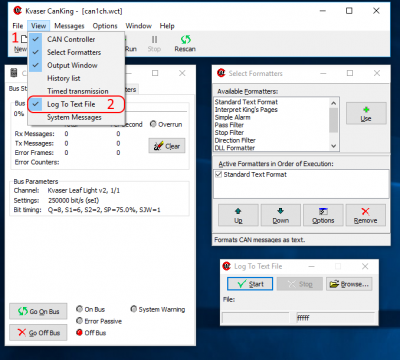
- Open CANking and navgiate to the logging feature
- Located: View (1) > Log to File (2)
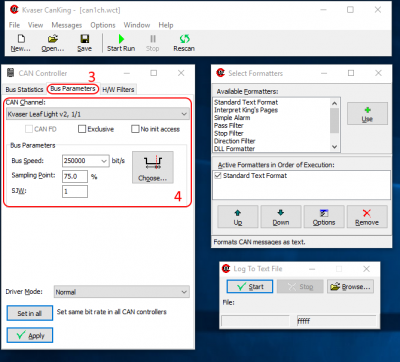
- Next, make sure CANking is configured to read CAN data from your hardware configuration
- Navigate to Bus Parameters (3) and select your CAN Channel and Bus Speed (4)
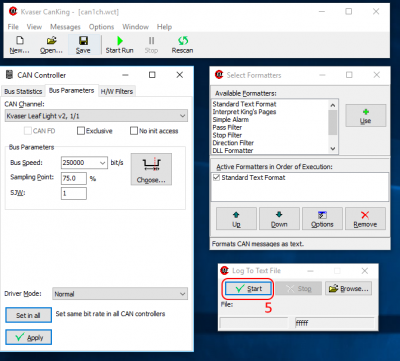
- Start a CAN log by pressing Start in the Log to File Window (5)
- This will prompt you to choose and save a file location
- Simulate the issue you are having - typically connecting to or flashing an ECU
- Once you have ran into your issue, stop the CAN log and locate the CAN log file
- Send us the CAN log file with a description of the issue you are having to support@neweagle.net


