MotoViewer: Difference between revisions
| (10 intermediate revisions by 3 users not shown) | |||
| Line 1: | Line 1: | ||
'''[[MotoService]]''' | {{Navigation}} [[MotoHawk-Platform | MotoHawk Platform]] > [[MotoService]] > '''MotoViewer''' | ||
[[File:MotoViewer0.jpg|right|300px|thumb|MotoViewer]] | |||
=Introduction= | |||
MotoViewer is MotoTron's PC-based display tool targeted at end-user/service situations. It is included as part of the '''[[MotoService]]''' package. The MotoViewer tool contains a subset of the functionality provided by '''[[MotoTune]]'''. A user-friendly, intuitive MS Windows-based display interface provides the user with easy access to all of the display-related RAM and ROM parameters contained in a MotoTron control unit. | |||
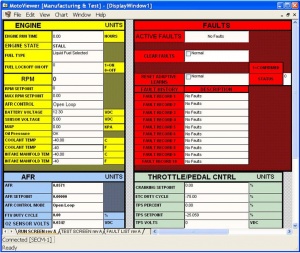
MotoViewer consists of a basic window with a menu bar, a display area and a status bar. MotoViewer is able to open display files (*.dis) created with MotoTune. Since it can only use display files, normal calibrations are not available. Most of the time, MotoViewer is used to inspect the values of '''[[MotoHawk]]''' probes. If, however, you need to allow the user to modify values in a production system (FLASH module), you will need to allocate calibrations to 'Display NV' in your MotoHawk model. This will allow the signal to be shown within a display file (*.dis) as well as allowing the value to persist through a key-cycle (power down) of the module. | |||
'''Main Window''' | |||
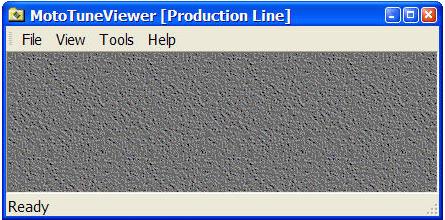
This is the main window with the menu bar, display area and status bar: | |||
This is the main window with the | |||
[[Image:MV_main_win.JPG]] | [[Image:MV_main_win.JPG]] | ||
=Using MotoViewer= | |||
When you open MotoViewer through the display shortcut on the desktop, MotoViewer should open with the selected display on the screen. The display will be populated with display parameters for the connected module. If there is no display shortcut on the desktop, you will need to first open MotoViewer independently. Once MotoViewer is opened, click on File in the menu bar and select Open from the sub-menu. You can also make use of the default shortcut key by typing Alt+O. Select the required display file to open a display. Another way to open a display is to click on File from the menu bar and move the mouse pointer over Recent Display. A list of recently opened displays should now pop out. This is a much faster way of opening displays you have recently viewed. | |||
When you open | |||
If there is no display shortcut on the desktop, you will need to first open | |||
Once | |||
Another way to open a display is to click on File from the | |||
'''About | '''About MotoViewer''' | ||
Click the Help | Click the Help in the menu bar and select About MotoViewer to view application and driver version. | ||
'''Menu Bar''' | '''Menu Bar''' | ||
The | The menu bar consists of the File, View, Tools and Help menus. | ||
'''Display Area''' | '''Display Area''' | ||
The | The display area is where all opened displays will be placed. You also have the ability to customize the background of the display area. See Display Options for details. | ||
'''Status Bar''' | '''Status Bar''' | ||
The | The status bar will display the current status of the connected module. Click on View from the menu bar and click on Status Bar to display or hide the bar. | ||
'''Toolbars''' | '''Toolbars''' | ||
| Line 43: | Line 40: | ||
[[Image:MV_disp_opt.JPG]] | [[Image:MV_disp_opt.JPG]] | ||
Click on View | Click on View in the menu bar. Select Options from the sub-menu to access Display Options. You can also right-click on Display Area and select Options from the menu that pops up. | ||
'''Preferences''' | '''Preferences''' | ||
Click on File from the | Click on File from the menu bar and select Preferences from its sub-menu. From the Preferences window, you will have access to the Locations and General tabs. From the Locations tab, you can change the locations of both the log files and the folder where all display files are found. From the General tab, you can reset the toolbars and workspace. | ||
===Customizing the Toolbar=== | ===Customizing the Toolbar=== | ||
| Line 53: | Line 50: | ||
[[Image:MV_toolbar.JPG]] | [[Image:MV_toolbar.JPG]] | ||
'''Toolbars Tab''' allows you to add, rename, delete and reset toolbars. | '''Toolbars Tab''' allows you to add, rename, delete and reset toolbars. As there are no default toolbars, all toolbars will have to be created from scratch. | ||
'''The Commands Tab''' allows you to drag and drop the various built-in commands or menus onto any existing toolbars on the main window. The commands are divided into the following | '''The Commands Tab''' allows you to drag and drop the various built-in commands or menus onto any existing toolbars on the main window. The commands are divided into the following four different categories: | ||
*File | *File | ||
*View | *View | ||
| Line 63: | Line 60: | ||
'''The Keyboard Tab''' allows you to Assign, Remove or Reset All shortcut keys to commands. | '''The Keyboard Tab''' allows you to Assign, Remove or Reset All shortcut keys to commands. | ||
'''The Tools Tab''' gives you the powerful ability to add a quick-launch button to bring up other useful tools from within | '''The Tools Tab''' gives you the powerful ability to add a quick-launch button to bring up other useful tools from within MotoViewer. | ||
'''The Options tab''' will feature settings and options for you to personalize the various toolbars and menus. These features are divided to | '''The Options tab''' will feature settings and options for you to personalize the various toolbars and menus. These features are divided to two sub-sections: Personalized Menus and Toolbars, Other. | ||
===Troubleshooting=== | ===Troubleshooting=== | ||
Remember that for | Remember that for MotoViewer to work, you must have a licensed MotoService dongle plugged into the computer. A MotoTune Dongle will '''not''' work. See Troubleshooting if licensee name does not show up. | ||
Most commonly occurring problems you may come across are caused by synchronization or connection problems between | Most commonly occurring problems you may come across are caused by synchronization or connection problems between MotoViewer and the module while programming the module. Below are a few things you can check to rectify these problems. | ||
*Check that the module has been powered up. | *Check that the module has been powered up. | ||
*Check that the USB-to-CAN cable has been connected properly. | *Check that the USB-to-CAN cable has been connected properly. | ||
*Check the port configuration of MotoServer has been configured properly. | *Check the port configuration of MotoServer has been configured properly. | ||
*Check if you have a licensed dongle and it has been plugged properly into the USB port. (Moving the mouse pointer over the MotoServer icon on the icon tray will determine if the dongle is plugged properly and that you have a licensed dongle) | *Check if you have a licensed dongle and it has been plugged properly into the USB port. (Moving the mouse pointer over the MotoServer icon on the icon tray will determine if the dongle is plugged in properly and that you have a licensed dongle.) | ||
*Close both | *Close both MotoServer and MotoViewer, then restart MotoViewer. (MotoServer will restart automatically once you reopen MotoViewer.) | ||
Latest revision as of 20:31, 27 February 2023
New Eagle > Products Wiki > MotoHawk Platform > MotoService > MotoViewer

Introduction
MotoViewer is MotoTron's PC-based display tool targeted at end-user/service situations. It is included as part of the MotoService package. The MotoViewer tool contains a subset of the functionality provided by MotoTune. A user-friendly, intuitive MS Windows-based display interface provides the user with easy access to all of the display-related RAM and ROM parameters contained in a MotoTron control unit.
MotoViewer consists of a basic window with a menu bar, a display area and a status bar. MotoViewer is able to open display files (*.dis) created with MotoTune. Since it can only use display files, normal calibrations are not available. Most of the time, MotoViewer is used to inspect the values of MotoHawk probes. If, however, you need to allow the user to modify values in a production system (FLASH module), you will need to allocate calibrations to 'Display NV' in your MotoHawk model. This will allow the signal to be shown within a display file (*.dis) as well as allowing the value to persist through a key-cycle (power down) of the module.
Main Window
This is the main window with the menu bar, display area and status bar:
Using MotoViewer
When you open MotoViewer through the display shortcut on the desktop, MotoViewer should open with the selected display on the screen. The display will be populated with display parameters for the connected module. If there is no display shortcut on the desktop, you will need to first open MotoViewer independently. Once MotoViewer is opened, click on File in the menu bar and select Open from the sub-menu. You can also make use of the default shortcut key by typing Alt+O. Select the required display file to open a display. Another way to open a display is to click on File from the menu bar and move the mouse pointer over Recent Display. A list of recently opened displays should now pop out. This is a much faster way of opening displays you have recently viewed.
About MotoViewer
Click the Help in the menu bar and select About MotoViewer to view application and driver version.
Menu Bar
The menu bar consists of the File, View, Tools and Help menus.
Display Area
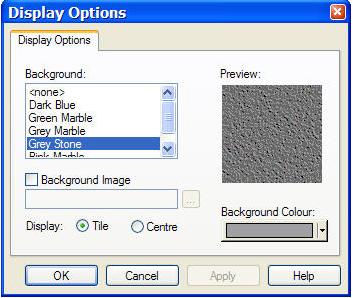
The display area is where all opened displays will be placed. You also have the ability to customize the background of the display area. See Display Options for details.
Status Bar
The status bar will display the current status of the connected module. Click on View from the menu bar and click on Status Bar to display or hide the bar.
Toolbars
Additional toolbars can be easily added by using the Customize option.
Display Options
Click on View in the menu bar. Select Options from the sub-menu to access Display Options. You can also right-click on Display Area and select Options from the menu that pops up.
Preferences
Click on File from the menu bar and select Preferences from its sub-menu. From the Preferences window, you will have access to the Locations and General tabs. From the Locations tab, you can change the locations of both the log files and the folder where all display files are found. From the General tab, you can reset the toolbars and workspace.
Customizing the Toolbar
Toolbars Tab allows you to add, rename, delete and reset toolbars. As there are no default toolbars, all toolbars will have to be created from scratch.
The Commands Tab allows you to drag and drop the various built-in commands or menus onto any existing toolbars on the main window. The commands are divided into the following four different categories:
- File
- View
- Tools
- Help
The Keyboard Tab allows you to Assign, Remove or Reset All shortcut keys to commands.
The Tools Tab gives you the powerful ability to add a quick-launch button to bring up other useful tools from within MotoViewer.
The Options tab will feature settings and options for you to personalize the various toolbars and menus. These features are divided to two sub-sections: Personalized Menus and Toolbars, Other.
Troubleshooting
Remember that for MotoViewer to work, you must have a licensed MotoService dongle plugged into the computer. A MotoTune Dongle will not work. See Troubleshooting if licensee name does not show up.
Most commonly occurring problems you may come across are caused by synchronization or connection problems between MotoViewer and the module while programming the module. Below are a few things you can check to rectify these problems.
- Check that the module has been powered up.
- Check that the USB-to-CAN cable has been connected properly.
- Check the port configuration of MotoServer has been configured properly.
- Check if you have a licensed dongle and it has been plugged properly into the USB port. (Moving the mouse pointer over the MotoServer icon on the icon tray will determine if the dongle is plugged in properly and that you have a licensed dongle.)
- Close both MotoServer and MotoViewer, then restart MotoViewer. (MotoServer will restart automatically once you reopen MotoViewer.)


