Template:Header: Difference between revisions
Jump to navigation
Jump to search
No edit summary |
No edit summary |
||
| Line 6: | Line 6: | ||
<br> | <br> | ||
|} | |} | ||
{{Navigation}} [[Raptor-Platform | Raptor Platform]] > '''Raptor Training''' | |||
<br> | |||
{{DISPLAYTITLE:Raptor Training}} | |||
[[File:Raptor-Training-Supplement.png|noframe|right|500px]] | [[File:Raptor-Training-Supplement.png|noframe|right|500px]] | ||
{| | {| | ||
| Line 11: | Line 15: | ||
<br> | <br> | ||
Raptor™ Training, created by our team of experienced system engineers, provides hands-on experience which enables the new practitioner to gain familiarity with the tool chain by building, deploying, calibrating, and refining a real world control application. Use this page as a guide during training, here you can find a detailed agenda, documentation and helpful links. | Raptor™ Training, created by our team of experienced system engineers, provides hands-on experience which enables the new practitioner to gain familiarity with the tool chain by building, deploying, calibrating, and refining a real world control application. Use this page as a guide during training, here you can find a detailed agenda, documentation and helpful links. | ||
=Training Agenda= | |||
This Agenda is the basic structure of Raptor Training, and provides an in depth tutorial on using Raptor in a real world environment. | |||
==Getting Started== | |||
===Software Requirements=== | |||
Below is a short software checklist for Raptor Training: | |||
* Windows 7 | |||
* MATLAB and Simulink | |||
* Raptor-Dev | |||
* Raptor-Cal | |||
* Compiler | |||
'''''Please note:''' If a Mathworks demo is required, please contact New Eagle Support prior to training | |||
For a full list on how to get started use the '''Getting Started Link''' Below: | |||
GETTING STARTED BUTTON HERE | |||
===Licensing=== | |||
Once Raptor is installed you will need to navigate to the New Eagle License Viewer. | |||
By default located here: | |||
<code>C:\Program Files (x86)\NewEagle\Raptor\YOUR_RAPTOR_VERSION</code> | |||
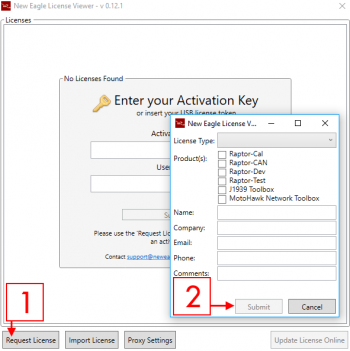
Below are the basic steps on how to request a new license: | |||
[[File:License viewer new request screenshot.png|350px]] | |||
*Select the settings button | |||
*Click 'New License' | |||
*Fill out the information, and click submit | |||
For more information on how use the License Viewer use the '''Raptor Licensing Button''' Below: | |||
LICENSING BUTTON HERE | |||
===Raptor Version=== | |||
The final step of setting up the Raptor-Dev envirment is linking it to MATLAB. This is easily done by opening the Raptor Configuration Editor. | |||
By Default located here: | |||
<code>C:\Program Files (x86)\NewEagle\Raptor\</code> | |||
This is also detailed in the getting started section, click below to view this section: | |||
GETTING STARTED BUTTON(LINK TO RAP CONFIG EDIT) | |||
==Raptor-Dev Basics== | |||
Now that Raptor-Dev is installed and ready for use, we will start off with some basic function of Raptor Dev. | |||
===Creating a Project=== | |||
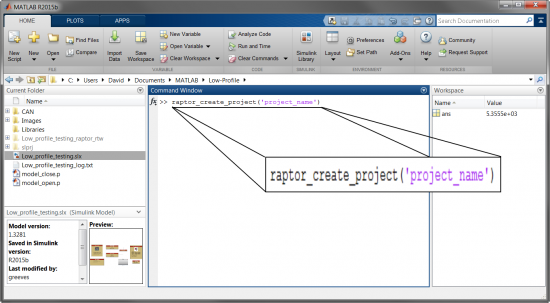
[[Image:Raptor_create_project.png|550px|right|thumb|The MATLAB window will look something like this]] | |||
Creating a new project is done by navigating to the MATLAB command console and typing: | |||
<code>raptor_create_project('project_name')</code> | |||
'''Note:''' Make sure to have your project name in the parentheses and within single quotes. | |||
Click below for more information of starting your first Raptor project: | |||
BUTTON HERE | |||
Revision as of 14:47, 4 August 2016
|
Raptor TrainingWelcome to an all inclusive guide to New Eagle's Raptor Training
|
New Eagle > Products Wiki > Raptor Platform > Raptor Training


