Template:Header
New Eagle > Products Wiki > Raptor Platform > Raptor Training
|
Raptor™ Training, created by our team of experienced system engineers, provides hands-on experience which enables the new practitioner to gain familiarity with the tool chain by building, deploying, calibrating, and refining a real world control application. Use this page as a guide during training, here you can find a detailed agenda, documentation and helpful links. Buy Now
Training OverviewThe Raptor Training course is designed to give an understanding of the Raptor Platform in an efficient, hands on manor. We will start off in the MATLAB / Simulink environment, showing concepts of Raptor-Dev's integration and how to use model based design to your advantage. Once a project is built it is time to transfer what has been created to a live system, consisting of the versatile industry standard gear, such as a GCM-196 Bosch controller, Kvaser leaf lights, and Smartcraft connection hubs. Using Raptor-Cal, New Eagle's premier calibration tool, we can calibrate and test the system by connecting to a throttle body controller and changing the value position. This overview contains all the topics of Raptor Training, and provides an in depth guide on using Raptor in a real world environment. Getting Started
MATLAB/Simulink Introduction
Raptor-Dev
Raptor-Cal
Raptor Hardware
DownloadsThis section is for all documentation you may need for Raptor Training
Training PrerequisitesThe following steps should be completed before the Raptor Training course! Special topics: If you or your company would like to cover some specific topics in Raptor Training, please contact us prior to your training so we can include additional information and examples. Software RequirementsBelow is a short software checklist for Raptor Training:
Please note: If a Mathworks demo is required, please contact New Eagle Support prior to training For a full list on how to get started use the Click Below:
Software Downloads To download the Raptor suite you must create an account at software.neweagle.net To create an account simply follow these steps:
After this process you must wait for a confirmation email. Note: Requests may to up to 48 hours to fulfill. Not processed on weekends. LicensingOnce Raptor is installed you will need to navigate to the New Eagle License Viewer. By default located here:
Below are the basic steps on how to request a new license:
For more information on how use the License Viewer Click Below:
Raptor VersionThe final step of setting up the Raptor-Dev envirment is linking it to MATLAB. This is easily done by opening the Raptor Configuration Editor. By Default located here:
This is also detailed in the getting started section, click below to view this section:
Raptor-Dev BasicsNow that Raptor-Dev is installed and ready for use, we will start off with some basic function of Raptor Dev. Creating a Project Creating a new project is done by navigating to the MATLAB command console and typing:
Note: Make sure to have your project name in the parentheses and within single quotes. Click below for more details on starting a Raptor project:
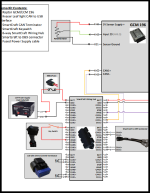
Kit Set UpA large part of Raptor Training is the hands-on experience, which is delivered using an simulated workbench using a GCM 196. Below is a diagram of how the training kit should be set up, this covers what should be configured and which pins should be connected. Select Downloads to view the GCM 196 block diagram, select More Details to see more information about this controller:
When this is complete, it is time to flash the module for the first time. Steps for this are provided in the next section! Raptor-Cal Calibration Tool New Eagle's Raptor-Cal is a powerful calibration tool that can be used to flash, calibrate and monitor modules. Using a simple, user friendly interface Raptor-Cal is the a great tool not only for this course, but for out in the field. Raptor-Cal's flash module function is extremely useful and necessary during training, since this is how we will get the software created in the Raptor-Dev environment to the module being used. Once you have build your first model and the training kit is set up correctly, it is time to flash. Below is a simple ECU flashing procedure:
This will now commence the flashing procedure.
Click below for more information on how to use Raptor-Cal: Raptor BlocksetsThe Raptor-Dev platform comes with a vast block library, packed and ready for development. Below there are a couple of descriptions for common blocks in the model: Analog Input This block reads the value of an analog input. An analog input is typically a voltage input on an input pin to the module. This block outputs the raw analog to digital converter counts. The scaling factor to convert from counts to engineering units may be different for different inputs, sensors or modules. The Full ADC Count indicated on the block represents a guideline for the maximum expected ADC count based on the underlying hardware - values above this threshold may not correspond linearly to those within the range. PWM Output This block sets the state of the selected PWM output. PWM (pulse width modulation) is typically used similar to an analog output.
Addition Raptor FeaturesThe Raptor-Dev platform contains many different blocks with a variety of functions, below are some common blocks used with the Raptor Training course. Override The Raptor override block is used to be able to override the value on a wire from the calibration tool. The block will normally pass the value at the input port to the output port. However when the override state is set to Override the block will output the value input from the calibration tool.
Measurement The Raptor™ measurement block is used to make values available within the calibration tool. A measurement is a value which typically read only within the calibration tool.
Adjustment The Raptor™ adjustment block is used to make values available within the calibration tool. An adjustment is a value which typically written from the calibration tool.
Fault Management The blocks in this subsystem are used to define, configure, and access application faults.
Data Storage The blocks in this subsystem are used to define, configure, and access application data.
|