MotoService
Introduction
MotoService is used to distribute the following apps to vendors in one installation file:
- MotoUpdate
- MotoViewer
- MotoServer Runtime
- KVASER driver installation
The install may be customized by placing an ECUFiles folder in the same directory as the Setup.exe. The ECUFiles folder will copy the contents of the folders (displays (.dis), TDBDLL (.dll), and Updates(.mfu)) into the target installations disks' ECUFiles folder. It should be noted that it will copy to the local disk only when distributed via a removable drive or zip archive.
The PortInfo.cfg file can be customized to add specific ports to the installation. The PortInfo.cfg file should be placed in the ECUFiles folder in the installation directory. This enables the distributors of MotoService to package their own CD or zip archive for distribution to vendors.
MotoUpdateAuthor is used to generate and maintain MotoUpdate (.mfu) files.
MotoUpdate
MotoUpdate™ is MotoTron's PC-based, end-of-line module upgrade tool. It provides end-users the ability to upgrade a module while out in the field. MotoUpdate™ is capable of upgrading any module within MotoTron's product range that has production software pre-installed. Upgrading a module in the field is a more convenient and quicker way than returning the module to have it reprogrammed.
Note: MotoUpdate™ can only be used with the correct license on a supplied dongle. If a licensed dongle is found, the licensee name will be displayed on the bottom left-hand corner of the application.
About MotoUpdate™
Left click the MotoUpdate™ icon on the top left-hand corner of the window and select About MotoUpdate™ to view application and driver version.MotoUpdate is an easy to use application to ensure simple and straightforward upgrading of modules in the field.
Location
Click on the drop down menu to select the specific module you wish to upgrade. Should the specific module not appear on the menu list, the specific module needed has to be configured through MotoServer™. See Port Configuration for details.
Exit
Click Cancel to close the MotoUpdate™ application. Note: MotoServer™ has to be manually closed after MotoUpdate has been closed. See MotoServer™ for details.
Next
Click Next to view the module’s Upgrade Options. MotoUpdate™ will now access the module to determine the Software ID for the software programmed onto the module.
Upgrade Options
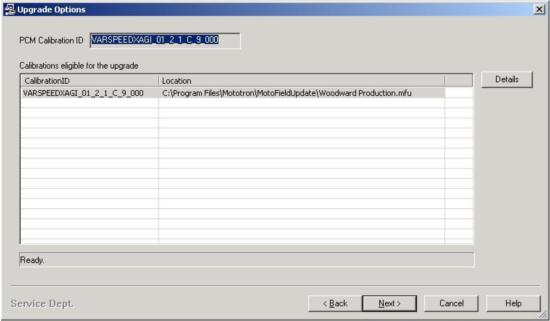
Once MotoUpdate™ has determined the Software ID, the suitable upgrade options will be displayed in a window.
Calibration ID
This is the unique calibration ID for the upgrade calibration patch that is available to the module. MotoUpdate™ matches the Software ID with the Calibration ID to determine compatibility. The location where the upgrade calibration patch is found is also displayed.
Details
Click Details to view Upgrade Details of the upgrade calibration patch found.
Back
Click Back to back up to previous window – MotoUpdate main window.
Next
Click Next to begin upgrading the module. This is a very crucial step in the upgrading process and a pop-up warning window (Fig.3) will appear.
Warning Window
It is very important that there are no interruptions to the upgrading process as it will render the module unusable. A “dead” module can only be resurrected by returning to your distributor to be reprogrammed.
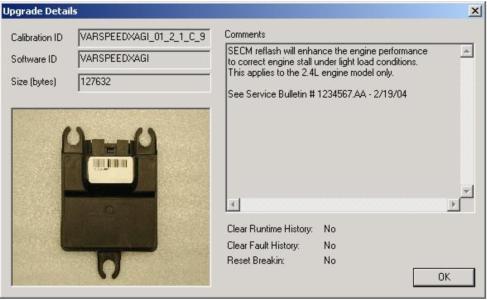
Upgrade Details
The upgrade calibration patch contains the unique calibration ID to be matched with the suitable version of software.
Calibration ID
This is the unique calibration ID for the upgrade calibration patch that is available to the module.
Software ID
This is the ID assigned to a particular version of software. Only compatible calibrations can be used with each version of software. MotoUpdate™ will try and match the Software ID found on the module with the Software ID on the upgrade calibration patch.
Comments
This provides a description for this upgrade calibration patch.
OK
Click OK to back up to previous window – Upgrade Options window.
Programming the module
MotoUpdate™ will now proceed with the upgrading. First it will look for the module on the specified location. Once the module is found, MotoUpdate™ will begin programming the upgrade calibration patch onto the module.The programming process should take less than 1 minute using the CAN bus, slightly longer if using serial bus.
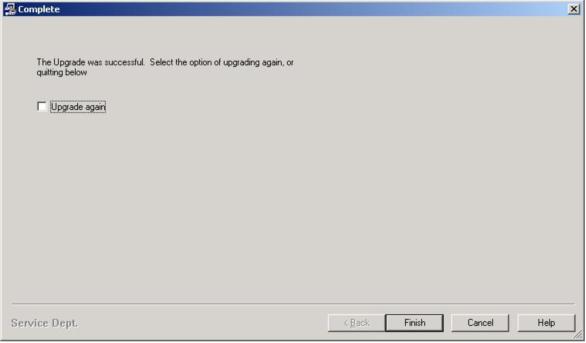
Once programming is complete, you will be given the option of upgrading another module or the quit MotoUpdate™ application. Click Finish to quit the application. Check the Upgrade again option and click Next to proceed to upgrading another module.
Troubleshooting
Most commonly occurring problems you may come across are caused by synchronization or connection problems between MotoUpdate™ and the module while programming the module.
Below are a few things you can check to rectify these problems.
- Check that the module has been powered up.
- Check that the USB-to-CAN cable has been connected properly.
- Check the Port Configuration of MotoServer has been configured properly.
- Check if you have a licensed dongle and it has been plugged properly into the USB port. (Moving the mouse pointer over the *MotoServer icon on the icon tray will determine if the dongle is plugged properly and that you have a licensed dongle)
- Close both the MotoServer and MotoUpdate™, then restart MotoUpdate™. (MotoServer will restart automatically once you reopen MotoUpdate™)
MotoService FAQs
What are the minimum PC system requirements for MotoService?
The official requirments are stated as:
- Pentium® III 667 MHz PC
- 256 MB of RAM
- Windows® XP SP2 and Vista or greater
MotoService (which is MotoViewer and MotoUpdate) has been used successfully on 'Windows 7 x64' as well.
How do I create an MotoService install package for my Service Technicians
Download MotoService, unzip that file on your engineering machine, inside the zip it looked like:
Inside 'ecufiles', add 'Programs' and 'TDBDLL', so it looks like:
You can add any srz's or MotoTune dll's that are needed for your customers, you might want to add a 'Displays' folder too, with any MotoTune displays your service technicians will need.
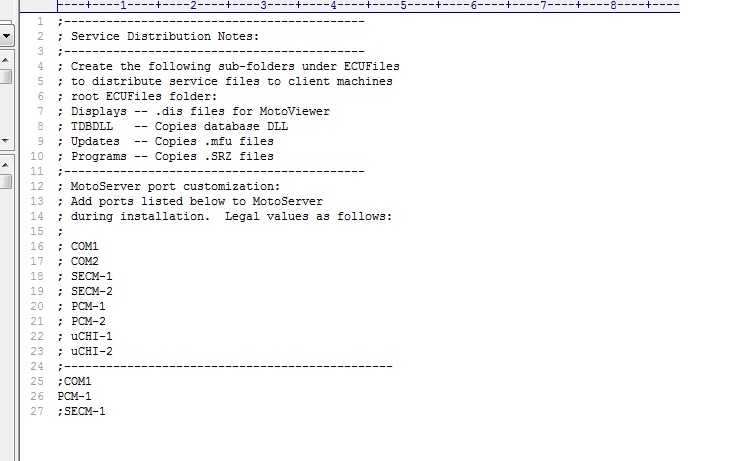
You can edit PortInfo.cfg to add/remove ports (these will be added/removed on the installed machine).
The example above will make it so that your customer has just PCM-1 on the machine after running the installer.
After these steps were complete, move the whole folder to a thumb drive (you might burn to a CD) and then install on new machine, running 'MotoService RELEASE 8.13.7.120.exe' from the thumb drive. Do not zip up the files, simply copy the whole directory out to the thumb drive (or burn to CD). See below:
When installed on a clean machine, you should see that the ECUFiles is replicated in the C:\ECUFiles\ folder required for the tools to connect to the ECU, and only port PCM-1 is available (with the example above).
What is a recommended hardware set-up for production module programming
- Set-up a test bench
- Dedicate a power supply and PC
- Use an anti-static pad
- Maintain some type of data base for version control including software and calibrations
- Create and Label the ECUs
- Pack and ship in an appropriate container


